Import tool package
Tool version | 1.5 |
|---|---|
Tool files | |
Tool name | wmx2economic.exe |
![]() Since E-conomic is a web-based solution, we can run this tool on our servers.
Since E-conomic is a web-based solution, we can run this tool on our servers.
Webshop settings
Before we can set up import utility, you should
- Grant access to wmx2economic utility from your e-conomic account
- Configure your webshop settings so that they match your accounting.
- Match webshop payment methods to payment alternatives in e-cnomic
- Match webshop sales managers to employees in e-conomic.
You will find step-by-step instructions below.
Granting access
- Open this link: https://secure.e-conomic.com/secure/api1/requestaccess.aspx?appId=MVb0nv3gZxc1XdWi9vP9ujneLRA9F6wj2fXZIE6Wh5Y%3d
- Enter your account details
- Press "Grant access" button
- Copy "Token ID" and send it to us.
Setting webshop payment method codes
Import will not work without this setup
To be able to import the orders, import utility should "know" what payment alternatives should be shown in e-conomic for each imported order.
This means, that for each webshop payment method you should select one of the e-conomic payment methods, as shown below:
- In webshop admin, go to the "Konfigurasjon" / "Payment methods" / "ERP Codes".
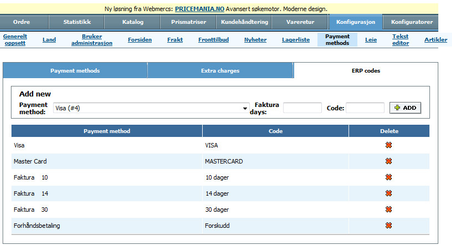
- Select payment method you want to from the "Payment method" list.
If payment method is "Net" or "Lb.md" you can specify number of due days in the "Faktura days" textbox. - Enter the E-conomic payment method name in "Code" field — EXACTLY AS IT IS IN E-CONOMIC — "Navn" from red square on the picture:
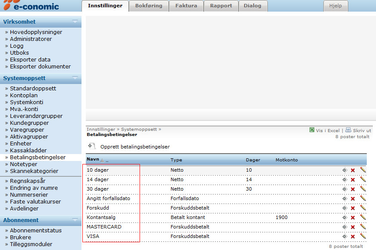
If your e-conomic accounting doesn't have relevant payment method, create it first. - Press "Add" button.
Do this procedure for each webshop payment method available to the customers.
Setting webshop sales manager #
Skip this step if you don't want to import orders with correct sales managers.
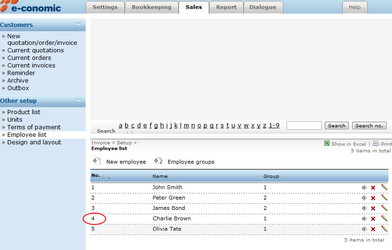
To allow import orders with correct sales manager ("Our reference" in terms of e-conomic), you should define "Employee Number" in e-conomic for each webshop sales manager, as shown below:
- In webshop admin, go to the "Konfigurasjon" / "Bruker administrasjon".
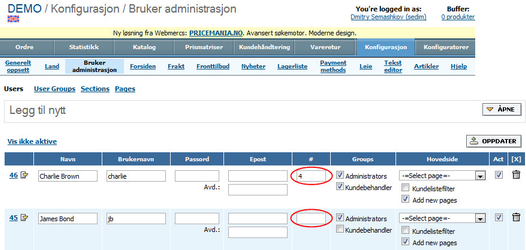
- Fill in the field called "#" (in red oval) with correct e-conomic "Employee number".
Import tool settings
![]() You need to create a file called
You need to create a file called settings.xml and place it in the same folder as the tool.
![]() You can define own log4net configuration — just place
You can define own log4net configuration — just place log4net.config in the same folder as the tool.
settings.xml
<?xml version="1.0" encoding="utf-8"?>
<Settings>
    <Account>
        <TokenId></TokenId>
    </Account>
    <!-- ERP Web Service account provided by Webmercs -->
    <Email></Email>
    <Password></Password>
    <!-- Email for receiving error reports. Separate multiple emails with ; -->
    <AdminEmail></AdminEmail>
</Settings>
How to use the import tool
Overview
For each order, the general version of the import tool does the following:
- Check if all the products exist in the accounting system. If any products don't exist, it will attempt to create them.
- Check if the customer exists. If the customer does not exist, it will attempt to create a new customer (unless we are instructed not to do so).
- Create salesorder
- Create purchase order (please see notes). Requires that ERP# field is filled out in webshop admin/catalog/vendors.
![]() The ERP# is the ID of the vendor in your accounting system - the link between the vendor in the webshop and the vendor in your system.
The ERP# is the ID of the vendor in your accounting system - the link between the vendor in the webshop and the vendor in your system.
Installing the tool
- download and unpack the files in a folder of your choice
- create a file called
settings.xmlaccording to the instructions and place in the same folder - check requirements and notes section and the info on how to run the tool
The following general requirements apply
- The computer on which you run the tool must have internet access
- The computer on which you run the tool must have access to the accounting system
- In most cases the computer on which you run the tool must have the accounting system client installed
- Windows XP/2003 operating system with .Net Framework 2.0 or higher
Running the tool
The tool would normally be run using Windows Scheduler at intervals that suit your needs (once a day, once every hour, etc). It can also be run from the command line.
<Tool name> -batch|-get|-transform|-import [o:<orderId>] [fd:<dd/MM/yyyy>] [td:<dd/MM/yyyy>] [l:<days>] [p]
required: one of the following
-batch | run complete import cycle (i.e. |
|---|---|
-get | download order XML |
-transform | convert order XML based on rules for given accounting system |
-import | import transformed/converted orders |
optional: any number of the following
o:<orderId> | choose specific order |
|---|---|
fd:<date> | choose orders after specified date |
td:<date> | choose orders before specified date |
l:<days> | choose all orders from <days> days ago until today |
p | choose "printed" orders |
<Tool name> refers to the name of the exe-program in the tool package (such as wmx2navision.exe).
<Tool name> -batch
This is the most common way to run the tool. It will download and import all orders with status ordered or shipped, set the webshop order to imported and write the accounting system order number in webshop order detail upon successful import of the order into the accounting system. If an error occurs during the import (say, an incorrect/unknown customer number), an email is sent to the AdminEmails indicated in settings.xml.
example: c:\>wmx2navision.exe -batch
<Tool name> -batch o:<orderNumber>
Same as above, except that it will only download one specific order. Use this when you test the tool.
example: c:\>wmx2navision.exe -batch o:26999
![]() If you know what you are doing, then you can use any of the options described above. If you are unsure whether you should use any of the options, then you probably shouldn't.
If you know what you are doing, then you can use any of the options described above. If you are unsure whether you should use any of the options, then you probably shouldn't.
Troubleshooting
When you run the tool it creates a report file in a sub-folder called \LOG - one file each time. If there are errors, or you have questions about a specific order import, we need to you send us that file. Every parameter that is set during the import process is logged, and in case of serious errors it will contain general error messages.