Import tool package
Tool version | 1.1 |
|---|---|
Tool files | |
Tool name | wmx2economic.exe |
![]() Since E-conomic is a web-based solution, we can run this tool on our servers.
Since E-conomic is a web-based solution, we can run this tool on our servers.
Webshop settings
Before we can set up import utility, you should
- Grant access to wmx2economic utility from your e-conomic account
- Configure your webshop settings so that they match your accounting.
- Match webshop payment methods to payment alternatives in e-cnomic
- Match webshop sales managers to employees in e-conomic.
You will find step-by-step instructions below.
Granting access
- Open this link: https://secure.e-conomic.com/secure/api1/requestaccess.aspx?appId=MVb0nv3gZxc1XdWi9vP9ujneLRA9F6wj2fXZIE6Wh5Y%3d
- Enter your account details
- Press "Grant access" button
- Copy "Token ID" and send it to us.
| Anchor | ||||
|---|---|---|---|---|
|
Import will not work without this setup
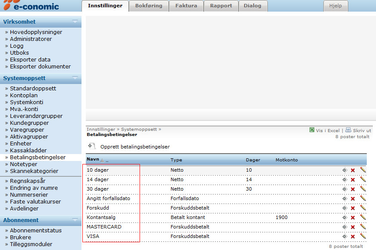
To be able to import the orders, import utility should "know" what payment alternatives should be shown in e-conomic for each imported order.
This means, that for each webshop payment method you should select one of the e-conomic payment methods, as shown below:
- In webshop admin, go to the "Konfigurasjon" / "Payment methods" / "ERP Codes".
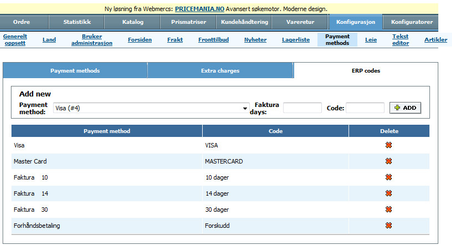
- Select payment method you want to from the "Payment method" list.
If payment method is "Net" or "Lb.md" you can specify number of due days in the "Faktura days" textbox. - Enter the E-conomic payment method name in "Code" field — EXACTLY AS IT IS IN E-CONOMIC — "Navn" from red square on the picture:
If your e-conomic accounting doesn't have relevant payment method, create it first. - Press "Add" button.
Do this procedure for each webshop payment method available to the customers.
Setting webshop sales manager #
Skip this step if you don't want to import orders with correct sales managers.
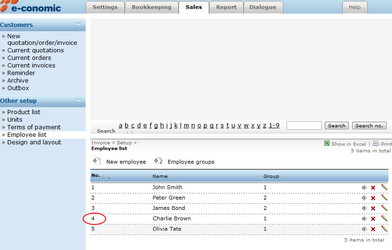
To allow import orders with correct sales manager ("Our reference" in terms of e-conomic), you should define "Employee Number" in e-conomic for each webshop sales manager, as shown below:
- In webshop admin, go to the "Konfigurasjon" / "Bruker administrasjon".
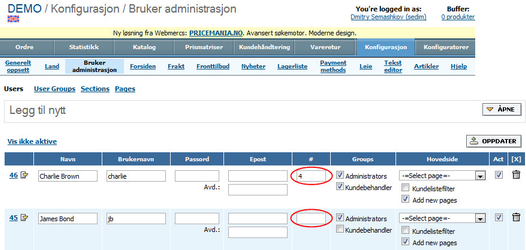
- Fill in the field called "#" (in red oval) with correct e-conomic "Employee number".
Import tool settings
![]() You need to create a file called
You need to create a file called settings.xml and place it in the same folder as the tool.
![]() You can define own log4net configuration — just place
You can define own log4net configuration — just place log4net.config in the same folder as the tool.
settings.xml
| Code Block | ||||
|---|---|---|---|---|
| ||||
<?xml version="1.0" encoding="utf-8"?>
<Settings>
    <Account>
        <TokenId></TokenId>
    </Account>
    <!-- ERP Web Service account provided by Webmercs -->
    <Email></Email>
    <Password></Password>
    <!-- Email for receiving error reports. Separate multiple emails with ; -->
    <AdminEmail></AdminEmail>
</Settings>
|
How to use the import tool
| Include Page | ||||
|---|---|---|---|---|
|